
If you’re doing PPC and love Google here’s an easy way to show Bing some love too.
So we all know that Bing plays second fiddle to Google when it comes to how we use search, with only 20% (in the UK) of the market share. It makes sense to concentrate your efforts and knowledge on understanding the Google algorithm and analytics, right?
In this blog, we will explore the benefits of this auto-tagging update, as well as how you can maintain conversions for iOS 11 after the announced changes. Very much a blog for the digital marketers amongst us.
So, if you already have Bing set up, or you’re looking to take your reporting to the next level, then checking out Bing auto-tagging is a great step. Enabling Bing auto-tagging is super quick and easy, and offers a whole host of benefits.
If you already have your conversion tracking in place, this will still be for you. Apple Inc. has introduced a new feature in Safari called Intelligent Tracking Prevention, which may impact the reporting of conversions to Bing Ads from Apple users who have installed the new High Sierra and iOS 11 operating systems. To help ensure that conversions continue to be reported accurately across your Bing Ads account(s), the steps listed below are consistent with Apple’s guidance on ad attribution.
The key benefits of Auto Tagging
> Saving time and tracking your Bing traffic without the need to set up and add URL and UTMs.
> Seeing more in-depth reports in Google Analytics.
> Track Safaris conversions easily, with at least 50% of the world using Safari on a Mac or iPhone.
> Read your insights in one location instead of jumping between different platforms, reducing possible errors in reading the data.
It’s so quick to set up that it will probably take you longer to read this blog than it will to actually enable the setting, but knowledge is always a good thing, right?
How to enable Bing auto-tagging
Take a look at this screenshot for the steps on how to enable Bing auto-tagging:
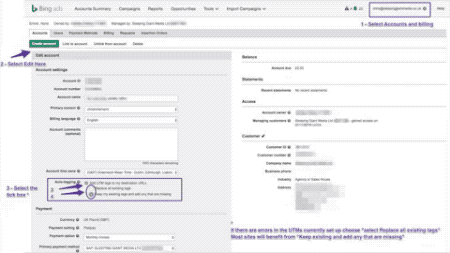
To recap, here are the instructions:
- First, start by selecting ‘Accounts and Billing’ from the settings menu.
- Then, under Accounts, select ‘Edit’.
- Within the menu, look for the ‘auto-tagging’ section, and then choose one of the two tick boxes. If there are errors in the UTMs you currently have set up, then choose “Replace all existing tags”. However, most sites will typically benefit from you selecting the “Keep my existing tags and add any that are missing”.
Here is an example of what you will see after enabling auto-tagging:
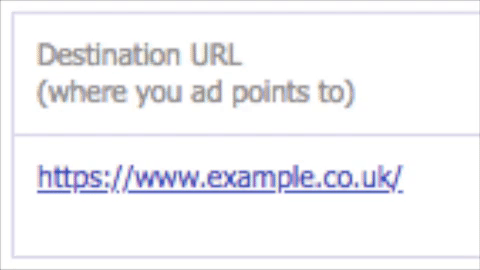
Based on the screenshot above, the items in {{curly brackets}} will be replaced depending on the keyword, campaign and adgroup specific to the work you are doing.
Bing will, however, autotag the below UTM parameters automatically if you have this setting enabled:
- utm_source= Is always Bing
- utm_medium= Is always cpc
- utm_campaign= Will dynamically change to the campaign in question
- utm_term= Will dynamically change to the keyword in question
- utm_content= Will dynamically change to the adgroup in question
If you follow the steps above to enable the “Keep my existing tags and add any that are missing” setting, then Bing will simply add the UTMs that are missing. The other tick box option will replace the current UTMs, which means you should use this option as a failsafe if you think mistakes might be made (this would make it impossible to use UTMs for your email campaign in Bing).
And just like that, you’ve enabled Bing auto-tagging. You now have access to more in-depth reporting in GA, and will be able to track conversions for Safari users too. The possibilities are endless!
Wrap the technical side of your brain around this and focus all of your online efforts into one analytics tool.
Got stuck along the way? Or want to know more about Bing or other techie tools? Our GIANTs are happy to help! Get in touch with the team for more information, or tweet us your questions at @SleepingGiantM. We’re here to help.